Whether you are a developer integrating content provenance into a pipeline, a journalist verifying photo origins, or a photographer protecting your work, c2patool is the Swiss-army knife you need. This guide covers everything — from installing the tool on Windows, macOS, and Linux to reading, creating, and verifying C2PA manifests like a pro.
Table of Contents
- What is c2patool?
- Prerequisites
- Installation (Windows, macOS, Linux)
- Verify Your Installation
- Basic Syntax
- Reading Manifests
- Detailed & Info Reports
- Saving Manifest Data to a Directory
- Creating Ingredients from Files
- Adding a Manifest to an Asset
- Understanding the Manifest Definition File
- Providing a Manifest on the Command Line
- Specifying a Parent File
- External (Sidecar) Manifests
- Remote Manifests
- Signing with Your Own Signer
- Trust Configuration
- Using the Official C2PA Trust List
- Working with BMFF (Video) Content
- Performance Tips
- Common Workflows & Recipes
- Troubleshooting
- Frequently Asked Questions
- Online Alternative: C2PA Checker
What is c2patool?
c2patool is the official open-source command-line tool created by the Content Authenticity Initiative (CAI) for working with C2PA (Coalition for Content Provenance and Authenticity) manifests. It is written in Rust and available on GitHub.
With c2patool you can:
- Read C2PA manifest data embedded in images, videos, audio, and documents
- Create new manifests and embed them (sign) into asset files
- Verify digital signatures against configurable trust lists
- Inspect ingredients, assertions, and provenance chains
- Generate external (sidecar) or remote manifests for advanced workflows
c2patool supports a wide range of file formats including JPEG, PNG, WebP, TIFF, HEIC, HEIF, AVIF, MP4, MOV, WAV, MP3, PDF, SVG, and more.
Prerequisites
Before installing c2patool, ensure you have one of the following:
- Pre-built binary — No dependencies needed (recommended for most users)
- Rust toolchain — Required only if building from source via
cargo
Installation (Windows, macOS, Linux)
There are four ways to install c2patool. Choose the method that works best for your operating system and workflow.
Method 1: Download Pre-built Binaries (All Platforms)
The easiest method. Download the latest release from GitHub Releases.
Windows
- Download the
c2patool-vX.X.X-x86_64-pc-windows-msvc.zipfile - Extract the ZIP to a folder, e.g.,
C:\c2patool - Add the folder to your PATH environment variable:
# PowerShell (run as Administrator) [Environment]::SetEnvironmentVariable("Path", $env:Path + ";C:\c2patool", "Machine") - Open a new terminal and verify:
c2patool --version
macOS
- Download the
c2patool-vX.X.X-x86_64-apple-darwin.tar.gz(Intel) orc2patool-vX.X.X-aarch64-apple-darwin.tar.gz(Apple Silicon) - Extract and move to your PATH:
tar -xzf c2patool-*.tar.gz sudo mv c2patool /usr/local/bin/ chmod +x /usr/local/bin/c2patool - If macOS blocks the binary, allow it in System Preferences → Security & Privacy
- Verify:
c2patool --version
Linux
- Download the
c2patool-vX.X.X-x86_64-unknown-linux-gnu.tar.gzfile - Extract and install:
tar -xzf c2patool-*.tar.gz sudo mv c2patool /usr/local/bin/ chmod +x /usr/local/bin/c2patool - Verify:
c2patool --version
Method 2: Install via Cargo (All Platforms)
If you have the Rust toolchain installed, you can install c2patool directly from crates.io:
cargo install c2patoolThis compiles c2patool from source and places the binary in ~/.cargo/bin/.
Method 3: Install via Homebrew (macOS / Linux)
brew install c2patoolHomebrew will manage updates for you — just run brew upgrade c2patool when a new version is available.
Method 4: Build from Source (All Platforms)
git clone https://github.com/contentauth/c2patool.git
cd c2patool
cargo build --release
# Binary will be at ./target/release/c2patool
Building from source gives you access to the latest features on the main branch.
Verify Your Installation
After installation, confirm c2patool is working:
c2patool --version
# Output: c2patool 0.26.27
You can also view the full help:
c2patool --helpBasic Syntax
Every c2patool command follows this pattern:
c2patool <ASSET_PATH> [OPTIONS] [SUBCOMMAND]Where:
<ASSET_PATH>— Relative or absolute file path to the asset[OPTIONS]— One or more command-line options (see full list below)[SUBCOMMAND]— Optional:trust,fragment, orhelp
Quick Reference: Key Options
| Option | Short | Description |
|---|---|---|
--manifest <file> | -m | Manifest definition file to add/embed |
--output <path> | -o | Output file or directory |
--config <json> | -c | Inline manifest definition (JSON string) |
--parent <file> | -p | Parent file (previous version of asset) |
--ingredient | -i | Create an ingredient report |
--detailed | -d | Show detailed internal C2PA format |
--info | Show high-level information report | |
--sidecar | -s | Generate external manifest (.c2pa file) |
--remote <url> | -r | Embed remote manifest URL reference |
--force | -f | Force overwrite existing output |
--tree | Display manifest tree structure | |
--certs | Show certificate information | |
--no_signing_verify | Skip post-signing verification (faster) | |
--version | -V | Display version |
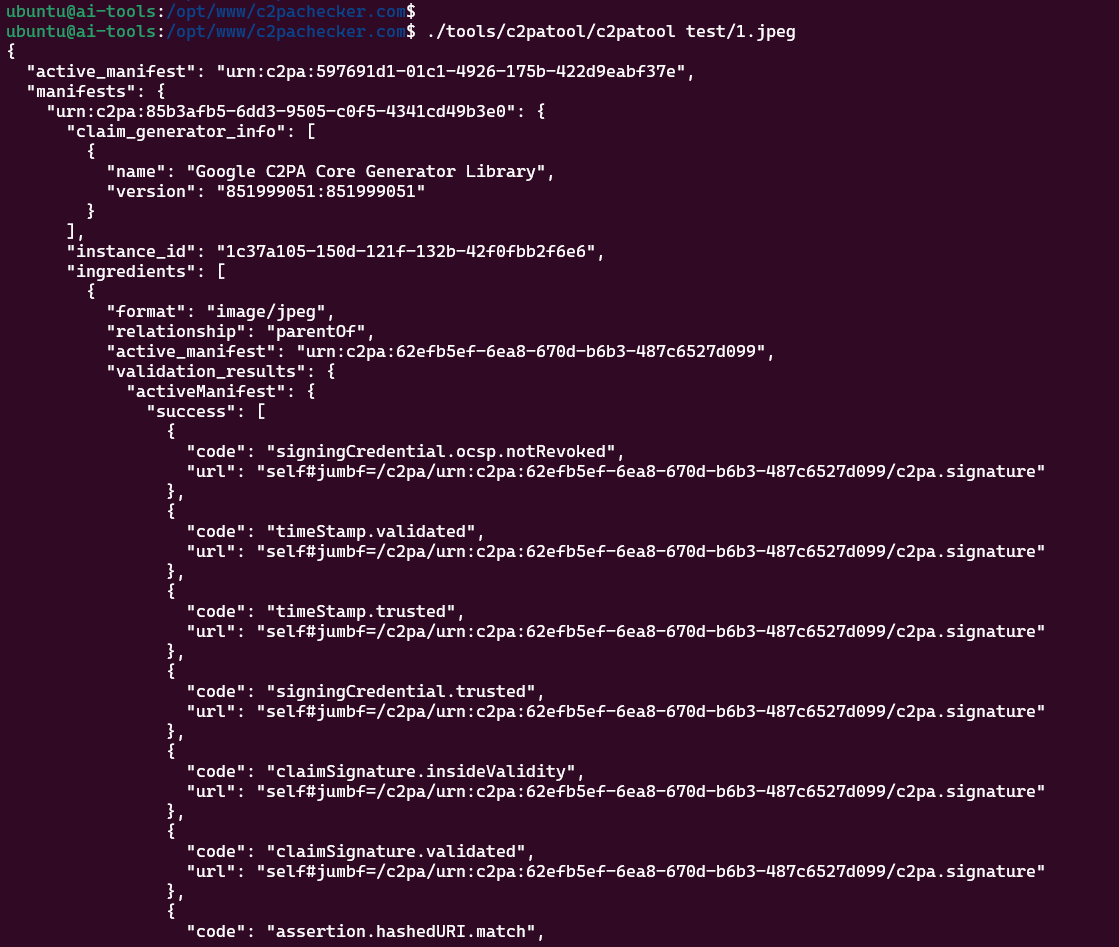
Reading Manifests
The most common use case: reading existing C2PA manifest data from a file.
# Read manifest and print to stdout (JSON)
c2patool photo.jpg

# Read manifest from a PNG
c2patool image.png

# Read manifest from a video
c2patool video.mp4

# Read manifest from a PDF
c2patool document.pdf
The tool outputs the manifest JSON to standard output, which you can pipe or redirect:
# Save manifest to a file
c2patool photo.jpg > manifest.json

# Pretty-print with jq
c2patool photo.jpg | jq '.manifests'

# Extract specific fields
c2patool photo.jpg | jq '.active_manifest'
If the file has no C2PA manifest, the tool will display an appropriate message.
Detailed & Info Reports
Detailed Report (-d)
The -d option displays the internal C2PA format of all manifests in the asset, great for debugging and deep inspection:
c2patool photo.jpg -dWhen combined with --output, it saves to a file named detailed.json in the output folder.
Information Report (--info)
The --info option prints a high-level summary: manifest store size, number of manifests, validation status, and cloud manifest URLs.
c2patool photo.jpg --infoThis is perfect for quick checks without reading the full manifest JSON.
Saving Manifest Data to a Directory
Use --output with a directory path to extract the full manifest including assertion thumbnails and ingredient data:
c2patool photo.jpg --output ./reportThis creates a folder containing:
manifest_store.json— Full manifest data- Assertion thumbnails
- Ingredient thumbnails
detailed.json(if-dwas also used)
Creating Ingredients from Files
The --ingredient (-i) option creates an ingredient report from an asset. When combined with --output, it extracts thumbnails and the binary .c2pa manifest store.
c2patool photo.jpg --ingredient --output ./ingredientThe resulting ingredient JSON can be referenced in a manifest definition to carry the full provenance history into a newly created manifest — essential for maintaining the chain of trust.
Adding a Manifest to an Asset
This is where c2patool shines for content creators. Use -m to embed a C2PA manifest into a file:
c2patool image.jpg -m manifest.json -o signed_image.jpgImportant rules:
- The output file extension must match the source — c2patool will not convert between file types
- If the output path is the same as the source, the tool overwrites the original
- Use
-fto force overwrite if the output file already exists
Signing Certificates
If your manifest definition includes private_key and sign_cert fields, c2patool uses those for signing. Otherwise, it falls back to a built-in test certificate (suitable only for development).
You can also specify credentials via environment variables. See Creating and using an X.509 certificate for production signing.
Understanding the Manifest Definition File
A manifest definition is a JSON file that describes the provenance claims you want to embed. Here's a complete example:
{
  "claim_generator": "MyApp/1.0",
  "title": "My Photo",
  "assertions": [
    {
      "label": "c2pa.actions",
      "data": {
        "actions": [
          {
            "action": "c2pa.created",
            "digitalSourceType": "http://cv.iptc.org/newscodes/digitalsourcetype/digitalCapture"
          }
        ]
      }
    },
    {
      "label": "stds.schema-org.CreativeWork",
      "data": {
        "@type": "CreativeWork",
        "@context": "https://schema.org",
        "author": [
          {
            "@type": "Person",
            "name": "Photographer Name"
          }
        ]
      }
    }
  ],
  "private_key": "certs/my_key.pem",
  "sign_cert": "certs/my_cert.pem"
}
Key fields:
claim_generator— Identifies your applicationtitle— Human-readable name of the assetassertions— Array of provenance claims (actions, creative work metadata, etc.)ingredients— References to source materials (optional)private_key/sign_cert— Paths to signing credentials
Providing a Manifest on the Command Line
Use --config (-c) to provide the manifest definition directly as a JSON string instead of a file:
c2patool image.jpg -c '{"assertions": [{"label": "org.contentauth.test", "data": {"my_key": "whatever I want"}}]}'This is convenient for quick tests and CI/CD pipelines.
Specifying a Parent File
A parent file represents the state of an asset before the current edits. Use --parent (-p) to create a provenance chain:
# Direct parent file
c2patool edited.jpg -m manifest.json -p original.jpg -o signed_edited.jpg

# Using a previously-created ingredient as the parent
c2patool original.jpg --ingredient --output ./ingredient
c2patool edited.jpg -m manifest.json -p ./ingredient -o signed_edited.jpg
This links the new manifest to the parent's provenance chain, creating a complete edit history.
External (Sidecar) Manifests
Use --sidecar (-s) to generate the manifest as an external .c2pa file instead of embedding it in the asset:
c2patool image.jpg -s -m manifest.json -o signed_image.jpg
# Creates: signed_image.jpg (copy of original) + signed_image.c2pa (manifest)
Sidecar manifests are useful when you cannot or do not want to modify the original file, such as with file formats that have limited C2PA support.
Remote Manifests
Use --remote (-r) to embed an HTTP reference to the manifest inside the asset. The manifest itself is stored externally:
c2patool image.jpg -r https://cdn.example.com/manifests/image.c2pa -m manifest.json -o signed_image.jpgThis creates:
signed_image.jpg— Contains a URL pointer to the manifestsigned_image.c2pa— The actual manifest file (upload this to the URL)
Remote manifests keep file sizes small and allow manifest updates without re-distributing assets. The remote URL must be publicly accessible for verification to work.
You can combine -s and -r to embed both an inline manifest and a remote reference.
Signing with Your Own Signer
When the private key is not available on the local system (e.g., using a cloud HSM), use --signer-path to specify an external signing executable:
c2patool image.jpg --manifest manifest.json --output signed_image.jpg --signer-path ./custom-signer --reserve-size 20248 -fThe signer executable receives claim bytes on stdin and outputs signature bytes on stdout. Use --reserve-size to pre-allocate space for the signature in the output file. Run c2patool --help for details on calculating this value.
Trust Configuration
The trust subcommand validates that an asset was signed by a trusted certificate. A certificate is trusted if it appears on an allowed list or chains back to a trust anchor.
c2patool photo.jpg trust [OPTIONS]Trust Subcommand Options
| Option | Environment Variable | Description |
|---|---|---|
--trust_anchors <pem> | C2PATOOL_TRUST_ANCHORS | PEM file or URL containing root certificates |
--allowed_list <pem> | C2PATOOL_ALLOWED_LIST | PEM file or URL of allowed end-entity certificates |
--trust_config <cfg> | C2PATOOL_TRUST_CONFIG | Trust configuration file with OID constraints |
Example using local files:
c2patool photo.jpg trust --allowed_list allowed_list.pem --trust_config store.cfgExample using remote URLs:
c2patool photo.jpg trust --trust_anchors https://server.com/anchors.pem --trust_config https://server.com/store.cfgIf c2patool cannot validate claims against the trust lists, the JSON output includes a validation_status field describing each validation problem.
trust subcommand makes HTTP requests each run. For bulk operations, cache trust list files locally to avoid performance overhead.
Using the Official C2PA Trust List
The official C2PA trust list is the production trust list used by tools in the C2PA conformance program, including Adobe's Content Authenticity Inspect tool.
c2patool photo.jpg trust --trust_anchors='https://raw.githubusercontent.com/c2pa-org/conformance-public/refs/heads/main/trust-list/C2PA-TRUST-LIST.pem'Or set it as an environment variable for persistent use:
macOS / Linux
export C2PATOOL_TRUST_ANCHORS='https://raw.githubusercontent.com/c2pa-org/conformance-public/refs/heads/main/trust-list/C2PA-TRUST-LIST.pem'Windows (PowerShell)
[Environment]::SetEnvironmentVariable("C2PATOOL_TRUST_ANCHORS", "https://raw.githubusercontent.com/c2pa-org/conformance-public/refs/heads/main/trust-list/C2PA-TRUST-LIST.pem", "User")With this set, simply run c2patool photo.jpg trust and the tool will validate against the official list.
Working with BMFF (Video) Content
The fragment subcommand adds a manifest to fragmented BMFF content (used in adaptive streaming formats like DASH and HLS):
c2patool video.mp4 fragment [OPTIONS]This is useful for content providers who deliver video via adaptive bitrate streaming and need to embed provenance data in the initialization segment.
Performance Tips
- Skip post-signing verification: Use
--no_signing_verifyto speed up signing operations in batch workflows. By default, c2patool validates the signature immediately after signing.c2patool image.jpg -m manifest.json -o signed.jpg --no_signing_verify - Cache trust lists locally: Download trust anchor PEM files and reference them locally to avoid HTTP requests on every invocation.
- Batch processing: Pipe file lists through a loop for bulk operations:
# Bash — sign all JPEGs in a folder for f in photos/*.jpg; do c2patool "$f" -m manifest.json -f -o "signed/${f##*/}" done - Use
--force: Add-fto avoid errors when output files already exist during batch runs.
Common Workflows & Recipes
1. Verify an Image from Social Media
# Quick check
c2patool downloaded_photo.jpg --info

# Full manifest extraction
c2patool downloaded_photo.jpg --output ./verification_report

# Verify against official trust list
c2patool downloaded_photo.jpg trust   --trust_anchors='https://raw.githubusercontent.com/c2pa-org/conformance-public/refs/heads/main/trust-list/C2PA-TRUST-LIST.pem'
2. Photographer: Sign Your Photos
# Create a manifest definition (save as my_manifest.json)
# Then sign your photo
c2patool RAW_0001.jpg -m my_manifest.json -o signed_RAW_0001.jpg

# Verify the signed photo
c2patool signed_RAW_0001.jpg
3. Developer: Automate in CI/CD
# Use inline config for quick CI signing
c2patool asset.png   -c '{"claim_generator": "CI/CD Pipeline v1.0", "assertions": [{"label": "c2pa.actions", "data": {"actions": [{"action": "c2pa.created"}]}}]}'   -o signed_asset.png   --no_signing_verify
4. Edit Chain: Preserve Provenance
# Step 1: Extract ingredient from original
c2patool original.jpg --ingredient --output ./ingredient

# Step 2: Sign the edited version with parent reference
c2patool edited.jpg -m edit_manifest.json -p ./ingredient -o final_signed.jpg

# Step 3: Verify the chain
c2patool final_signed.jpg
5. Check if an Image is AI-Generated
# Read the manifest and look for digitalSourceType
c2patool ai_image.jpg | jq '.manifests[].assertions[] | select(.label == "c2pa.actions")'

# Look for: "digitalSourceType": "trainedAlgorithmicMedia"
Troubleshooting
Common Issues
| Problem | Solution |
|---|---|
No manifest found | The file does not contain C2PA data. Not all images have manifests. |
Output file already exists | Add -f to force overwrite. |
Unsupported file type | c2patool only supports specific formats. Check the supported formats list. |
Signing failed | Check your private_key and sign_cert paths. Ensure the certificate is a valid X.509 cert. |
Trust validation failed | The signing certificate is not on the trust list. This doesn't mean the manifest is fake — it may use a test certificate. |
| macOS: "unidentified developer" | Go to System Preferences → Security & Privacy and click Open Anyway. |
| Windows: SmartScreen warning | Click More info → Run anyway. The binary is safe but not code-signed by Microsoft. |
Frequently Asked Questions
Is c2patool free?
Yes. c2patool is fully open-source under a dual MIT / Apache 2.0 license.
Can I use c2patool in production?
Absolutely. However, do not use the built-in test certificate for production signing. Obtain a proper X.509 certificate from a certificate authority and ideally use a KMS/HSM to protect your private key.
What file formats are supported?
JPEG, PNG, WebP, TIFF, GIF, HEIC, HEIF, AVIF, MP4, MOV, MP3, WAV, RIFF, PDF, SVG, and more. Check the official documentation for the latest list.
Does c2patool strip EXIF data?
No. c2patool preserves existing metadata including EXIF. It adds C2PA data alongside existing metadata.
Can I remove a C2PA manifest?
c2patool does not have a built-in "strip" command. However, certain image editing tools can remove C2PA data when re-saving files.
How does c2patool differ from the C2PA Rust SDK?
c2patool is a CLI wrapper around the c2pa-rs Rust SDK. If you need programmatic access in your application, use the SDK directly. c2patool is ideal for command-line workflows, scripting, and quick inspections.
Online Alternative: C2PA Checker
Don't want to install anything? Use C2PA Checker to verify C2PA manifests directly in your browser.
- ✅ No installation required
- ✅ Supports all C2PA file formats
- ✅ Detects AI-generated content via
digitalSourceType - ✅ Verifies digital signatures
- ✅ Multi-file batch verification (up to 20 files)
- ✅ Also available as a Chrome Extension
- ✅ Completely free — no signup needed
For automated workflows, CI/CD pipelines, and advanced use cases, c2patool is the better choice. For quick one-off checks, C2PA Checker is the fastest path.